allanwallace.uk : CG125 : Tips
CG125 ES4 Cush Drive Bushes and how to replace them.
If you buy a 2nd hand CG125 with a few miles on it - like I did - there will likely come a point in time when the cush drive bushes need done.
For me that moment came almost 6000 miles after buying mine.
The previous owner bought the bike with 9962 miles on it, he never needed to replace the cush drive bushes.
I bought it from him with 30630 miles on it and by 36604 miles really really needed to replace them.
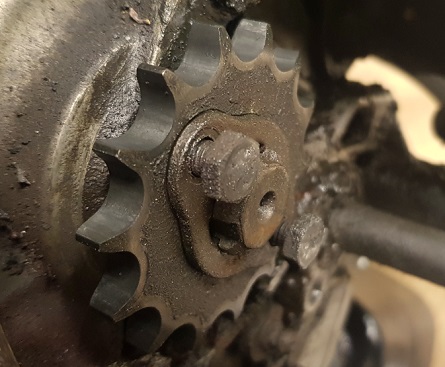
Please note: - Wobbly sprockets are dangerous.
Yes, this applies to a wobbly front sprocket on a CG125...
as well as wobbly rear sprocket...
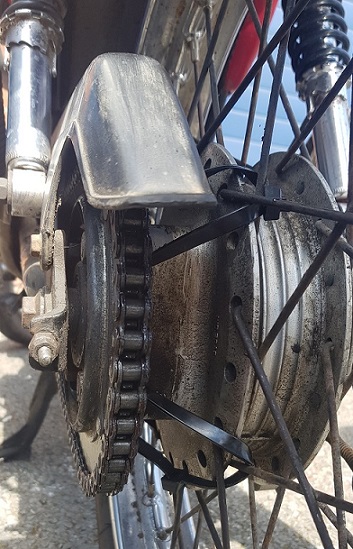
Note: - This is not the correct fix for a wobbly rear sprocket :D
If your CG125's cush drive bushes are severely worn - or worn-out completely like mine were - then this is a job best worth doing, and worth doing right.
My CG125's cush drive bushes were perfect when I got the bike, but I thrash it for most of the many thousands of miles I have put on it.
Top Tip:
If you need your CG125's cush drive bushes done, my advice is to pay a professional.
I am not joking. It is not that this job is difficult (it really isn't "difficult"), it's just noisy, time consuming, dirty, smelly, and an almighty pain in the ass without the correct tools.
This particular week I had noticed some play in my CG125s rear sprocket* when I was cleaning my chain, so I read various blogs to try and get some hints and tips, and some advanced warning of how much of a pain in the ass it would be trying to remove the hardened steel remains of a cush drive bush from a blind hole in an alloy cg125 hub when the centre sleeves had gone and you don't have a suitable bearing puller.
I didn't know how bad mine were going to be, but I planned for the worst.
My searches found plenty of information of how people had done this job, and there were a few different options / techniques suggested.
• Pay a professional
• Pay an amateur
• Pay a friend
• It's not that bad, honest! (AKA buy the cush drive bushes and "bolts" and replace the cush drive bushes myself).
For some reason, I chose the "Its not that bad, honest!" option.
With the wrong tools (Sadly I neglected to get a photo of the wrong tools)
I was successful!
Eventually...
!!! CAUTION! !!!
I read a LOT of forum posts, blog posts, that mentioned the risk of cracking the aluminium hub.
Worse I read a number of posts and one blog where people attempting this repair had done exactly that.
I did not want to repeat this.
One page gave an indication that it "could take 40 hours with the wrong tools"
(source needed) , another page said as little as ten with a dremel or similar.
Apart from a cheap microdrill similar to a dremel, I had the wrong tools.
I still have the wrong tools, but now more of them are broken, including the microdrill.
On the bright side I have completed them on my CG125 ES4.
Timeline (written the 2nd day, i.e. the day of completion).
From taking the wheel off yesterday evening at 18:00pm, working until 22:00, then starting again at 17:30 today, until finishing putting the rear wheel back on and adjusting the rear brake at 23:05 this evening.
THAT'S NINE AND A HALF HOURS...
of almost continuous grinding / cutting / hammering / dirt / hot dirt / hot melty dirt / blue smoke / and the sound of a microdrill running at several thousand rpm....
I have tinitus and a headache now, btw.
How to remove/ replace / install cush drive bushes on a CG125 / CG125-ES / CG125-ES4 / CG-125-ES8 / and probably some chinese copies too.
In reverse order:
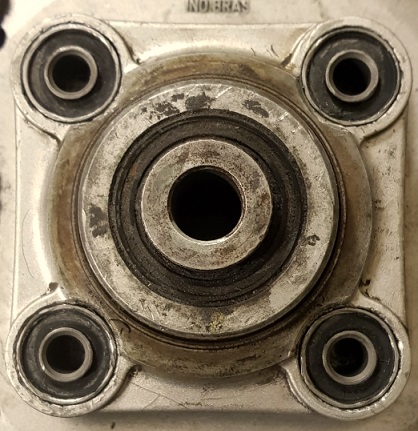
Installing the bushes:
It took 13 minutes to install the 4 new genuine honda cush drive bushes.
That includes boiling a kettle, rolling a cigarette, making a cup of tea, removing the cush drive bushes from the freezer, installing them while smoking the cigarette and drinking the cup of tea.
How to install a cush bush into a CG125 rear hub:
To install the bushes, it mainly involves gently persuading them to go in, with a soft covering over them (piece of wood / leather) and a large hammer.
Slowly.
- Remember the comment above about the risk of cracking the hub!
Oh and it's a little bit noisy.
Top Tip: - You have to get to this point first:

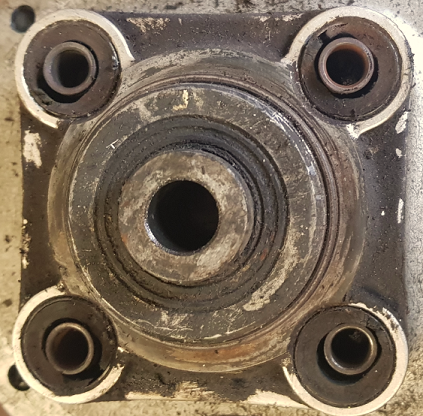
Removing the worn bushes:
Can you afford a professional? or do you want the experience?
If you are a masochist, need your head examined, enjoy bleeding, or simply want the experience, read on:
Removing Inner Sleeves:
Mine were well worn, the central metal cylinders / internal sleeves fell out. The "rubber" didn't meet them. The holes were enlarged and elongated,
- they basically fell out.
Unfortunately this meant that the technique of putting screws into the rubber part of the bush ad then using a puller on them, simply was't an option.
Removing rubber:
Ugh. The blogs that talk about fluffy tiny little soft / hot / melting rubber particles getting everywhere were not kidding.
Neither were the ones talking about the joys of the blue smoke.
It gets everywhere. It's sticky. It's difficult to remove. It's bound to be bad for the health.
With the dremel, it took hours. It's not difficult, but it's very boring, and the dremel makes a high rpm whine.
Ear protection and Eye protection is recommended
Clothes you can throw out that cover your arms legs and face may be a good idea but on the other hand when it's 30c outside I can survive getting my arms dirty.
MANY tedious, noisy, (potentially vibration white finger inducing) hours later, almost half of the rubber was removed.
I went to bed. I slept badly. I felt really disheartened at this point.
This morning i went to work, leaving the rear wheel in the car with the windows shut in the full sun all day (to get the rear wheel nice and warm) and then as soon as I finished work at 17:30, I continued removing the rubber.
My technique had improved at this point.
@18:33 - 63 minutes later - I had the first worn bush remains completely removed from the first hole.
This made a big difference to my mood.
@20:05 - 92 minutes later - I had the second worn bush remains completely removed from the second hole.
Ok well, win some, lose some. Next!
@20:42 - 37 minutes later - third worn bush successfully completely removed from the third hole!.
Tinitus and headache starting to set in....
@22:43 - 121 minutes / two ****ing hours and a bit later - I finally got the remains of the fourth bush out.
The outer sleeves of all bushes were hard, the outer sleeve of this bush was insanely hard. I mean, seriously, not the same ball game, this sleeve didn't bend, it splintered into slivers, and only then if you hit it hard enough.
Urgh.
Because the cutting discs for the drill were larger than the outer bush diameter I had to wear the discs away on the tops of the outer sleeve before i could start cutting down into them.
Because of this, from the very first bush I had alternately cut part of one bush, part of the next, part of the next, and so on.
The "two ****ing hours and a bit later" comment above, doesn't give a realistic statement about how long the last bush took, I started cutting it - like all the others - before the first was out.
Dremel type drill is not ideal, proper Dremel might be - I haven't used one.
Ear protection and eye protection recommended.
Not sure if it was steel or cutting disc fragment i got in my eye earlier, it's stopped hurting but is a little bit irritating.
Listening to my cg at 11,000 rpm is one thing, listening to a dremel cutting disc trying feebly to make a mark on hardened steel outer bush sleeves is another.
Top Tip: - before you get to this point you have to remove the rear sprocket
Removing the sprocket
This is much easier with two people. I haven't managed to remove the big circip on my own when I tried in the past, but with two people it's achievable in under 60 seconds,
one to hold the circlip pliers to hold the circlip more open, another to use a selection of flat blade screwdrivers to pull the circlip slightly away from the opening, and then slide one side over the end of the hub before the other.
Then remove the big washer.
Then lift the sprocket towards you. If you're bushes aren't completely knackered, then you may need to use some effort.
Refitting is achievable by one person with a pair of circlip pliers, and takes seconds.
Removing the wheel and chain I'm pretty sure you can work out.
I can get the rear wheel off without needing to take the chain off, which in my case, that's one long bolt (axle) and one nut for the wheel.
As it happened on this instance I did undo the chain as I have a clip-chain, which can make life a lot easier.
Anyway, road test ok. Tinitus still present. Headache starting to ease, palms of hands sore, stinging, underside of fingers and thumbs tingling.
If you can't afford a professional, or like me thought that the experience would be useful, you CAN manage.
The wrong tools to complete a CG125 cush drive bush change successfully were:
• Thick nose pliers. (I have a clip chain, it has it's advantages.)
• Thinner nose pliers. (To vainly attempt to twist out the bushes' outer sleeves, you will need them eventually...)
• 22mm spanner.
• 17mm spanner.
• dremel or similar drill.
• cutting discs for said drill. I used about 9 before me drill became unusable due to a failure of one of it's ALUMINIUM components.
I would happily have used three or four more cutting discs....
• A selection of small flat head screwdrivers, preferably disposable.
I broke the tips of two, a previously broken one didn't break any further, I bent two, and two plastic handled ones I made 1cm and 4cm shorter.
• Hammer.
• 17mm socket.
• piece of wood, or leather, to protect the face of the bush. If you care that much by this point.
That's basically it.
And if you wonder why I used both a 17mm spaner and 17mm socket, the 17mm nut on the axle is near the exhaust, spanner fits easily, socket does not.
As for hammering the cush drive bushes in, the spanner wouldn't work for that.
Last Updated 2022/04/12 21:50 CET.
Cookie Policy
Privacy Policy
Security Policy
Terms & Conditions
© 2019 Allan Wallace